There are many reasons we would want to send a file from our phone to our computer or from our computer to our phone. The easiest way for an android phone and linux desktop would be just to connect the two apparatus using USB cable. The phone then would be just like any other storage device where we could go through the contents of the phone and transfer as our heart pleased.
However, sometimes we would want to embrace the “wireless” life (or simply wouldn’t bother to move from the table to take the wire which is just a few inches away – that is me). Here we have several options that might not work equally well, depending on some instance on your hardware specifications and maybe internal software. (My old android 5 phone is having some trouble with some of this stuff).
Bluetooth
This is the most basic I guess, but also the most hardware dependent probably. I never had much luck with this one, probably because my hardware are in the budget to middle categories most of the time (Okay okay, all of the time). The process is easy enough. Let us start with sending file from a computer to a phone. Movement in the other direction would apply the same way, but with Android UI. How one do it will probably differ a little bit depending on the specific program, and maybe window manager/desktop environment of choice.
In my IceWM window manager I use Blueman Bluetooth Manager. If you already have it started, all you have to do is turn the bluetooth on from the applet at the panel or toolbar. Click on the icon and choose “Turn Bluetooth On”.

Here, I will be focusing on just sending files. Other use of the Bluetooth technology will not be touched here. After the Bluetooth Manager (Blueman) has been turned on, click on its icon on the panel or toolbar, and then choose “Send Files to Device…”. A “select files to send ” window will be opened, where we can choose the file(s) to be sent. Then another window will opened, this time giving a choice to “Select Device”. Choose the appropriate device that the file(s) would be send to. Then we can send the file. Some confirmation might be needed from the other device before a file or files can be transferred to.
We can also pair the devices that we want to use regularly. Clicking the Blueman applet on the toolbar or panel, choose “Set Up New Device “, and a guided tutorial will help you:

As I said, I haven’t had much luck with Bluetooth. It sometimes work and sometimes not. Most probably due to the old hardwares.
Before we proceed to the next section, if you would want to take a look at Blueman, you can do so at their github page: https://github.com/blueman-project/blueman. For installation in Ubuntu based distro (and probably Debian based) just type in the terminal:
sudo apt install blueman
At the time of writing you’ll get Blueman version 2.1.3 from the Ubuntu repository, while on Github the newest version is not very far off (2.1.4).
On a more complete Desktop environment, the Bluetooth application might be integrated within the desktop experience such as in Ubuntu, where you can turn Bluetooth on or off from the system menu at the right corner of your screen.
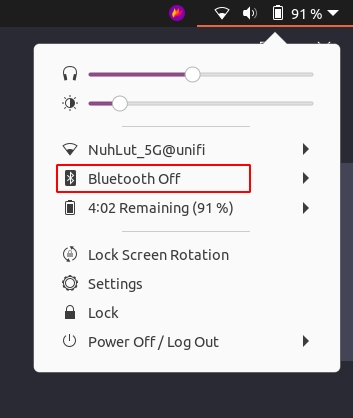
Turning the Bluetooth on on both devices, we can then go to Bluetooth settings to set up our devices to be paired with.

We will be directed to the Bluetooth page in the Settings. Under the “Devices” heading we can see all the devices that are being detected.

Click on the device that we want to connect and press the connection button.

From the picture above we can guess how to send a file from the devices. Just press the “Send Files…” button. Saying that, if it is just for one time file delivery we can press the “Send Files…” without establishing connection. The PC will make the connection anyway, for security reasons.
So, we see that both Bluetooth managers, utilizes a similar concept albeit through a different UI. Thus we can assume that most Bluetooth managers will act about the same way. (Switch on Bluetooth, select device, pair or connect the device, and transfer files). As we see below, the same concept or flow is still utilized for different connecting mechanism that do not necessarily utilizes Bluetooth technology.
KDE Connect
If you have been using Linux with an android smartphone for a while and still havent’t heard of KDE Connect, you are missing a lot. It can do media control, input, and yes, even file transfer from your mobile device. Just as Bluetooth, you can make it as one of your startup application. But we are not going to explain it here. [It seems however to be always working in the background using default Ubuntu, as I can control my media using the android phone. But this features is not there by default using my own installation of IceWM].
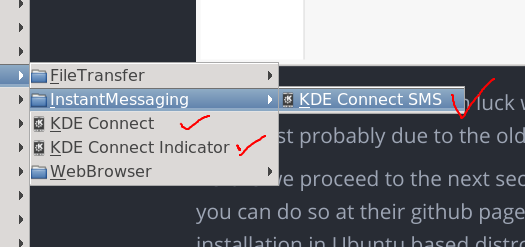
There is however, one annoyances for some people. Not all. It will comes with a few desktop item entries, such that you will has at least three KDE Connect menu entries. These include KDE Connect that will open the main application, KDE Connect indicator that will open an applet on your panel or toolbar, and lastly KDE Connect SMS that can help you write SMS from your PC.
This is fine with me, as as I am a proponent of having multiple applications doing specific jobs rather than one application doing all, such as what happened with web browsers. For further information on this application you can visit KDE Connect’s website: https://kdeconnect.kde.org/](https://kdeconnect.kde.org/).
From your Android device you also need to install the KDE Connect from the Google Store or F-Droid. After that, open the application in both your desktop PC and your Android device and set up to pair them. Also don’t forget to make sure that they are connected to the same WIFi at least. As you open the KDE Connect application in your PC, you can see the android device listed with comment such as “Device not trusted”. Click on the device’s name and ask to pair the device to make it trusted.

Before going any further, a little comment is in place. Depending on your distribution and desktop environment, you may need to actively open the application to set it up, as mentioned above. In my custom IceWM Window Manager, I need to open up the application before it can be use (because I didn’t put it at my startup application so it didn’t work in the background, which is my preferred method) . Whereas, in my default Ubuntu Gnome’s Desktop Environment I didn’t even have to open it to use the media control features.
To send a file to your phone, the easiest way is to have the KDE connect indicators on your toolbar or panel. If it is not setup at startup just open it from start menu.
In Gnome (default Ubuntu):
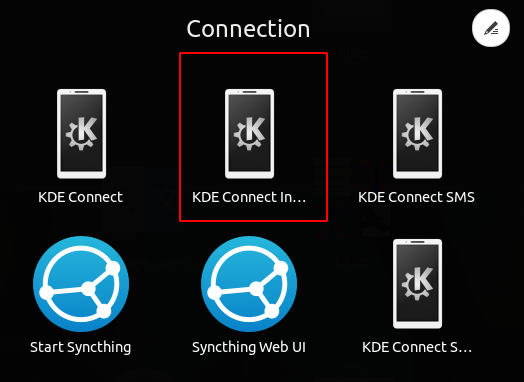
Or from my IceWM:

Then, click on the icon on the panel or toolbar (some cases try right-click), choose the device and select “Send File”. You will be direted to a “Select File” window where you can choose the file to be send. I am not sure, but I think only one file can be sent at a time.
If however, for whatever reason, you can’t have the indicator on the panel or toolbar, you can still send the item using the KDE Connect application. Just click on the name of the device and select the action intended. In our case it will be the “Share File” option.

KDE Connect so far is the best way to have a connection and integration between your Android phone and your Linux desktop. But I have experience failure in sending file, especially when there is a lot of files to be sent. But probably that is not why it is created, so we can’t really blame it. Thus we need a more suitable application for that. I told you I like things that do specific things rather than a lot of things at once. Most of the time.
Which bring us to the next method. Syncing. Wait wait. Don’t go yet. This is not an over the cloud kind of syncing. But locally, on your own hardware.
Before I forgot, in Ubuntu and Debian base (I think), we can install it from the command line thus:
sudo apt install kdeconnect
But you can also use graphical software manager such as Ubuntu Software.
Syncthing
There are probably some other application for this, but the one that I am using is called “Syncthing”. It is a “continuous file synchronisation program”, where your file is synced in real time. As long as you turn it on of course. But if your are using a potato PC like I am, you would probably wanted to open it only when needed, like I does. I am not saying it uses a lot of resources, but hey, for me even opening Bluetooth app uses 1% of RAM, not to mention battery life. I know I am being thrifty but I prefer use that 1% for things that I currently am using. Saying that, this application work wonders. I mean this is one thing that never fails me. It take a little longer, due to I need to open it in both potato PC and phone, but it can transfer large files, in term of size and quantity.
Unlike the other 2 methods above let us start by showing how to install it. A full description can be found on its website: https://syncthing.net/downloads/. Here I will just show the Ubuntu/Debian-stable channel way. And of course, don’t forget to donate. The same for the above projects as well, KDE Connect and Blueman.
There are two channels for the application, stable and candidate. Below is the method given in it’s webpage or stable channel.
- Adding the stable channel:
echo "deb https://apt.syncthing.net/ syncthing stable" | sudo tee /etc/apt/sources.list.d/syncthing.list
- To finish setting up and install sycthing:
curl -s https://syncthing.net/release-key.txt | sudo apt-key add -
- Increase preference of the packages:
printf "Package: *\nPin: origin apt.syncthing.net\nPin-Priority: 990\n" | sudo tee /etc/apt/preferences.d/syncthing
- Update and install:
sudo apt-get update
sudo apt-get install syncthing
- To get it running type
syncthingin the terminal. - At the webpage go to
http://localhost:8384/. Where local host is normally 127.0.0.1. So I would type in: http://127.0.0.1:8384/. However, this is normally done automatically after step 5 was done.
Fortunately (for some users as some people might prefer terminal) steps 5 and 6 can be apply differently using desktop file on the menu. In the menu we should have 2 links, one for starting the service, and the other is for opening browser’s application.


To start the service open the “Start Syncthing” application first. Or we can also type in syncthing command in the terminal. One of the advantage of using terminal command over the GUI is that launching “Start Syncthing” didn’t automatically open the Web UI in the browser. So using the GUI, it is more of a two step process where we need to open “Syncthing Web UI” application after the “Start Syncthing” link. (Although one may counter the argument by saying that using a terminal requires one to open the terminal or run the Run Command app, either by pressing alt+F2 in Gnome or ctrl+alt+spacebar in IceWM – thus a similar two steps processes).
Or like the two application before this, we could set it up for a startup program.
After we have installed and open the web browser application, it is time to add the device we want to sync with. Of course, Syncthing need also to be installed and opened in the android’s phone. The following is a typical view of the web UI:

First step as you might have guess is to link the devices. At the bottom right corner we can find “Add Remote Device” button. Clicking on it will make a window to pop up. Here we can add a device by referring to its ID, which can be taken from the device’s Syncthing apps or Web UI (Click on Action > Show ID).

If however, we open the device nearby we will get a notification under the “Device ID” box on the device ID. While Device name is the name we given the device for easy identification. After we add the device to our computer, the device will get a notification about our desire to make that link. Accepting it will give us the same process as in our PC. If we don’t get the notification we can add the PC or laptop to our Android device through similar process.
After the devices has been linked (we can have more than 2 devices), we can start to add folders that linked this two devices. Clicking the “Add Folder” button at the bottom of the left column. A window will pop-up, helping us in the process.

Under the General tab, we have a few things to be looked at. “Folder Label” let us name the folder (not necessarily the same name as we have on our PC) to help us remember the folder, while “Folder ID” is used to identify uniquely the folder across devices. Thus if we add a folder in another device by linking this ID, the two folders will be linked. “Folder Path” is the location of the folder in said PC.
Meanwhile, under the Sharing tab we can choose the device(s) to be sync with this folder. Another interesting matter is under the Advanced tab, where there is an option to choose how the parent-child relation work. Files can be send & receive, send only, and receive only. This may be useful in certain circumstances. I myself, for example, use it by having one folder to send only and another to receive only. Just to keep track of things.
After that is done, we may receive a notification on our device about the request to pair this folder. In our device’s app we can then choose a pair folder. If it does not appear, we can always create a new folder from the app and use the same Folder ID as the one we create previously in our PC.
And basically that’s it. Just put the files we wanted to transfer to that folder while both applications are opened in the respective devices. A more detailed discussion can be referred to its documentation: https://docs.syncthing.net/.
References
Blueman. https://github.com/blueman-project/blueman
Downloads (na). Retreived from https://syncthing.net/downloads/ at 18 Jan 2021.
Documentation -Syncthing https://docs.syncthing.net/.
KDE Connect. https://kdeconnect.kde.org/.
